Pages

10/08/2010

How to use the best YouTube Video Converter for Mac

What is YouTube
YouTube is a video sharing website on which users can upload and share videos. The company is based in San Bruno, California, and uses Adobe Flash Video technology to display a wide variety of user-generated video content, including movie clips, TV clips, and music videos, as well as amateur content such as video blogging and short original videos. Most of the content on YouTube has been uploaded by individuals, although media corporations including CBS, the BBC, UMG and other organizations offer some of their material via the site, as part of the YouTube partnership program.


When you need to convert YouTube videos on Mac, iFunia YouTube Converter for Mac is an excellent choice. It is an easy-to-use yet powerful tool that allows you to download YouTube videos and convert YouTube videos to popular video&audio formats. So download the best YouTube Video Converter for Mac now and you are ready to start converting it.

iFunia YouTube Converter for Mac is the ideal Mac YouTube downloader and Mac YouTube converter(.flv converter)-enabling you to download and convert YouTube videos to a wide arrange of video formats including MP4, M4A, MOV, MP3, etc, enabling them to be played on iPad, iPhone, iPod, Apple TV or Quick Time Player. iFunia YouTube Converter for Mac also doubles as a YouTube HD video downloader and converter. It helps you download and convert YouTube HD video to HD MP4, HD MOV, HD AVI and more.

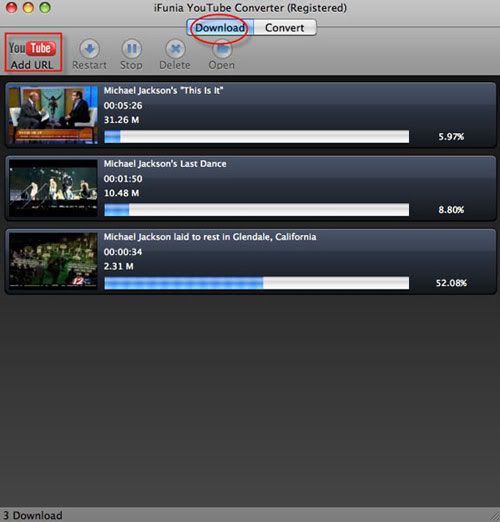
Step 1. Download YouTube videos with the best YouTube Video Converter
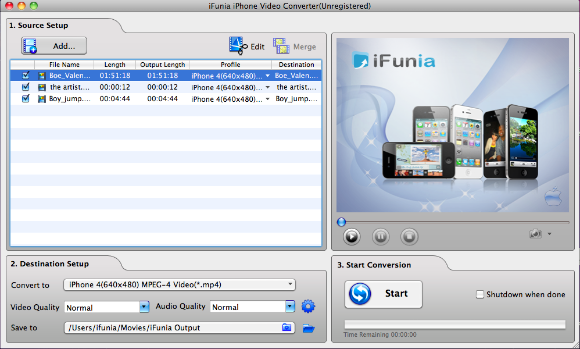
Run the YouTube tool. After that Click Add button in iFunia YouTube Video Converter and simply copy and paste a YouTube video URL to the Video URL field. And then specify a directory on your computer to save the YouTube video files, click "Download" button and start to download the YouTube video files.


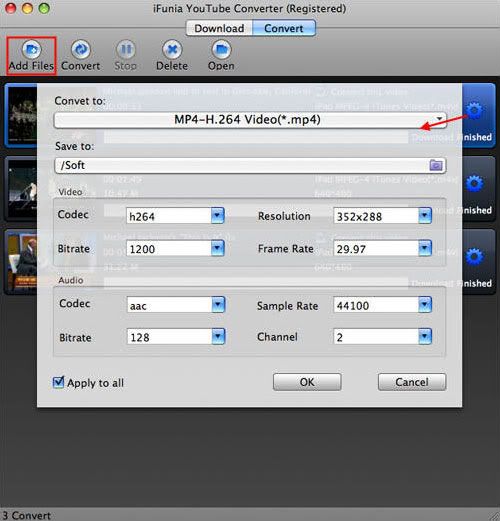
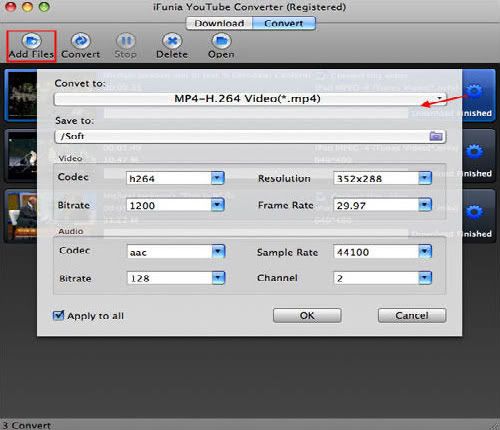
Step 2. Convert YouTube videos to other video formats in the best YouTube Video Converter
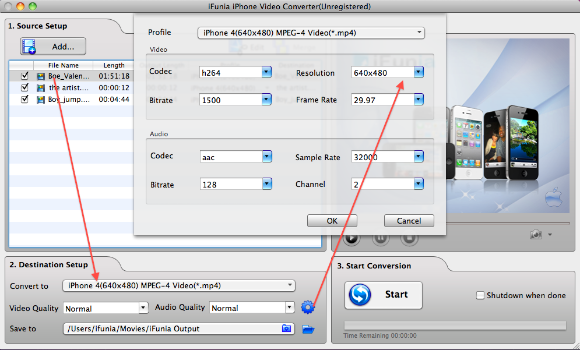
After the download is completed in YouTube Video Converter for Mac, you can now convert them to the video file formats that you want. Click the "Gear" button at the right side and change the output format you like from the "Convert to" drop-down menu list. Select the best video format for each video file and specify a directory to save the YouTube video files. Remember that the output file size mostly depends on the Bitrate you set. Larger Bitrate, larger file size. Actually the default profile given is configured with good quality output.


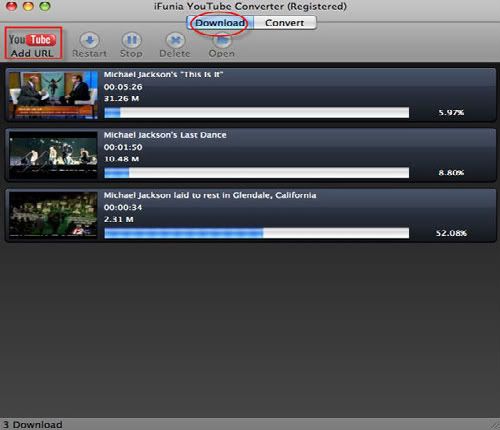
Step 3. Start converting YouTube videos in the best YouTube Video Converter
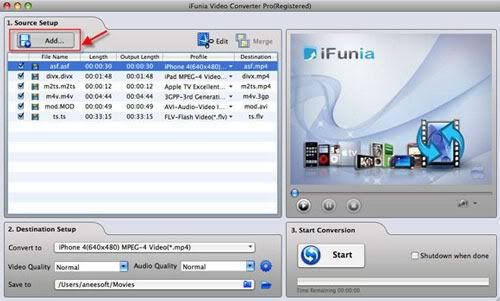
Now you may click the button "Convert" to begin converting the YouTube videos. The conversion progress bar will show you how much of the encoding is completed. The converting time will depend on several variables including: the duration of the video file, the speed of your computer, what other activity your computer is currently doing, the codec you selected and the bitrate you set.

Tips:
Unregistered users of Youtube can watch the videos, while registered users are permitted to upload an unlimited number of videos. Videos that are considered to contain potentially offensive content are available only to registered users over the age of 18. The uploading of videos containing defamation, pornography, copyright violations, and material encouraging criminal conduct is prohibited by YouTube's terms of service. Accounts of registered users are called "channels".

You can only add one YouTube video URL at one time. But you're able to add multiple videos for download by repeating this step.

Read more...

9/29/2010

How to get, convert DVD movies for iPad playback on Mac

The iPad is the first tablet computer developed by Apple Inc. It is part of a device category between a smartphone and a laptop computer. The iPad, with 9.7-inch LED-backlit glossy widescreen display, 1024-by-768-piexl resolution, the HD feature makes watching DVD movies an utterly new experience. The following tutorial is going to show you how to convert DVDs to iPad with iFunia DVD to iPad Converter for Mac.


iFunia DVD to iPad Converter is the best and most powerful DVD to iPad converter, which allows you to rip and convert your loved Hollywood DVD movies to iPad-ready MP4, M4V and MOV video formats and M4A, MP3, AIFF, WAV audio formats. iFunia DVD to iPad Converter Mac also allows you to trim DVD movie, crop DVD and select DVD subtitle and audio track to convert your movie with any available languages.

Preparation: Download the free trial version, install and run iFunia DVD to iPad Converter.
Step 1 Load movies to the DVD to iPad Converter for Mac
Now get your DVD disc and insert it. Then run iFunia DVD to iPad Converter on your Mac and click the big button "Load..." to load your DVD disk, you may see the name of DVD Movie disk if you insert DVD disk before running this DVD ripper tool (see the image below to have an idea). This may take up to a minute or two depending on the contents of the DVD and the speed of your optical drive.


Step 2 Select iPad MPEG-4 Video (*.mp4) as output format
In the Destination-Setup section of the interface, choose the right preset for your iPad device in the Convert-to drop-down menu. Here I set the output video format to 'iPad MPEG-4 Video (*.mp4)'.


Step 3 Hit Start to rip DVD to iPad for Mac
Click "Start" button to start converting DVD to iPad. When the conversion is done, you can transfer converted DVDs to iPad, and enjoy it comfortably on a cozy sofa!

Tips:
This professional iFunia DVD to iPad Converter for Mac is specially design for Apple iPad, aiming to enable iPad users an exquisite experience of viewing DVD movies on your iPad's widescreen. If you are using Windows, please go to iFunia DVD to iPad Converter for Windows.

Read more...

Convert MKV, FLV, HD, WMV…Videos for iPad using iFunia iPad Video Converter

iPad, declared by Apple Inc. as a magical and revolutionary product, is announced on January 27, 2010 and released on April 3, 2010. The tablet computer is quickly popular among people who go after the latest fashion. Therefore, iFunia iPad Video Converter for Windows is created to solve the problem that the videos can't be played by iPad.

The best iFunia iPad Converter software can convert all common video format to iPad, from: HD Video (inc. MPEG-2 HD and WMV HD), MOD, M2TS, AVI (DivX,Xvid, etc.), MP4 (inc. Sony PSP and Apple iPod), WMV, 3GP, QuickTime (MOV), VOB, MPEG-1, 2, 4,H.263, H.264, Real Video, MKV, FLV and more.

With the iFunia Video Converter for iPad, it can be so easily realized to crop video to remove black video sides. You can also trim your video files or merge all added videos and output one file. Users could personalize videos, try to add picture or text watermark with customized transparency, size and position in your video. Also it supports Windows 7. Below is the step-by-step guide about how to convert different video into iPad-ready formats on Windows.

Step 1 Add video to iFunia iPad Video Converter
Download iFunia iPad Video Converter for Windows and run the program, click Add…button to select and open the video file you wish to convert. iFunia iPad Video Converter supports most of the popular video formats, so you can easily convert FLV to iPad, MKV to iPad, and even HD video formats like AVCHD M2TS MTS to iPad format.


Step 2 Select iPad preset from output format list
In the Destination-Setup section of the interface, choose the right preset for your iPad device in the Profile drop-down menu. There are many options when you're converting your videos for your iPad, obviously, the better the quality, the larger the file size. Ultimately it's a personal decision everyone has to make on what's more important: space on your iPad or audio/video quality.


Step 3 Hit Start to iPad video conversion on Windows
Now you may click the big button "Start" to begin the conversion. The convert progress bar shows you how much of the encoding is completed. The encoding time will depend on several variables including: the duration of the video file, the speed of your computer, what other activity your computer is currently doing and the bitrates you set.

Tips:
This professional iPad Video Converter for Windows is specially design for Apple iPad, aiming to enable iPad users an exquisite experience of viewing video entertainment on your iPad’s large screen. If you find yourself saving and converting video on a regular basis, then spend a few bucks and get the software. Also if you are using Mac OS, please go to iFunia iPad Video Converter for Mac.

iPad Supported H.264 video up to 720p, 30 frames per second, main Profile level 3.1 with AAC-LC audio up to 160 Kbps per channel, 48kHz, stereo audio in .m4v, .mp4, and .mov file formats; MPEG-4 video, up to 2.5 Mbps, 640 by 480 pixels, 30 frames per second, simple profile with AAC-LC audio up to 160 Kbps, 48kHz, stereo audio in .m4v, .mp4, and .mov file formats; Motion JPEG (M-JPEG) up to 35 Mbps, 1280 by 720 pixels, 30 frames per second, audio in ulaw, PCM stereo audio in .avi file format.

Read more...

9/27/2010

How to convert MKV to iPhone 4 for Mac

MKV, short for Matroska Video, unlike MP3, MP4 and things like those, is not a media format but an extensible open standard Audio/Video container. We can definite it as a multimedia container.
As we know, the new iPhone 4 does not support MKV format. So if you want to play your MKV files on iPhone 4, you should convert MKV to iPhone 4 supported format first. Then how to convert MKV to iPhone 4? Is there any easy-to-use MKV to iPhone 4 Converter?

Here is the solution: iFunia iPhone 4 Video Converter for Mac is a specialty to dedicatedly convert MKV to iPhone 4 videos. This guide is going to help you easily convert between several video formats like your favorite MKV file to MP4 for your iPhone 4.

What You Will Need
*A Mac computer
*iFunia iPhone 4 Video Converter for Mac, download a trial to give it a try
*The MKV file(s) you wish to convert
*iTunes to sync your iPhone 4


Getting Started
Step 1 Add MKV video files to Mac iPhone 4 Video Converter
After you launch the iFunia iPhone 4 Video Converter, click the "Add..." button and select the MKV file you wish to convert. This iPhone 4 video converter for Mac supports drag-drop and batch conversion, so you can import and convert several MKV files at a time.


Step 2 Select output profile and change iPhone video and audio settings
iFunia iPhone 4 Video Converter for Mac has several video profiles to choose for iPhone output format. Select an MP4 profile from the list, in this case, select "iPhone 4 MPEG-4(640*480) Video (*.mp4)". Using this profile will yield a good quality video for your iPhone 4. You can also change the Resolution, Encoder, Bit rate and Frame rate to get the best quality of MKV video on iPhone. The size of the iPhone file depends a lot on these settings.


If you would like you may select the output folder, by default iFunia iPhone 4 Video Converter for Mac will save the file in the default folder as the original file.

Step 3 Start MKV to iPhone 4 Conversion
After all the settings, just click 'Start' to convert MKV to iPhone 4 on Mac OS. After a few minutes waiting, you can play the converted MKV files on your iPhone 4.

Step 4 Sync video to iPhone 4 via iTunes
Finally you want to use iTunes to add the output file to your library. Usually when you select "Add File to Library..." the file will be placed in your Movies section once you've done that you're all set and ready to sync with your iPhone 4. If you've never synced your iPhone before checkout Apple's detailed activation and syncing the iPhone video, the syncing segment is about half way into the video.

Tips:
iFunia iPhone 4 Video Converter for Mac isn't only for the converting MKV to iPhone 4, it can also convert the following formats to iPhone 4 compatible formats: AVI, MPG(MPEG), WMV, MP4, MOV, VOB, ASF, RM, RMVB, 3GP, 3G2, FLV, MKV, MOD, TOD, TS, DV, H.261, H.264, M4V, DAT, AVCHD Video (*.mts, *.m2ts), H.264/MPEG4 AVC Video(*.m2ts;*.mts), Quick Time HD Video (*.mov), WMV HD Video (*.xwmv), Audio-Video Interleaved HD Video (*.avi), MPEG2 HD Video (*.mpg; *.mpeg), MPEG4 HD Video(*.mp4), MPEG-2 TS HD Video (*.ts), HD FLV Video(*.flv), NUT, YUV, NSV, MPV, MJPG, MJPEG, DIF, DVR-MS, QT, etc.

If you are Windows users, try iFunia iPhone 4 Video Converter for Windows.

Read more...

9/17/2010

How to promote your app with iAd?


iAd is just like iTunes that offers oppertunity for third-party software company which want to promote and sale their products, like ifunia, they are dedicated in creating best app to make your digital life more fun. Actually, iFunia can't appear iTunes without an obvious reason. Why? and How?

Read more...

9/12/2010

How to upload and edit YouTube videos


Video editing usually requires installing software packages and having a fair amount of technical savvy. But now YouTube have introduced its new YouTube Video Editor which allows you to create video mashups and edit down clips from your library of existing YouTube video uploads. Here we will walk you through how to upload and edit the YouTube videos with the YouTube Video Editor.


Convert videos to the best video format for YouTube uploading
To use this YouTube Video Editor all you need is your YouTube account and a few of your own YouTube video uploads, as the YouTube Video Editor does not let you edit other user's material. So you need to upload the videos to YouTube website first. If you do not think your video file is supported by YouTube, you may get the best YouTube video uploading results from converting videos to the best YouTube video file format with iFunia Video Converter Pro for Mac.


First you need to download and install iFunia Video Converter Pro for Mac, after that click on the "Add" button to add the videos which you want to upload to YouTube. You may add as many videos as you want for batch conversion. This program also has a built-in video editing tool. You can crop the video to remove black sides, trim the video and add text or image watermark. To start the video conversion step, just select the format you want and hit "Start" to begin the YouTube video conversion on Mac.

Now you have convert the videos to the YouTube supported video format, you can start uploading videos to YouTube, first login your YouTube account and press the "Browse" button to locate the YouTube video file on your computer and then press the "Upload Video" button, the amount of time required to upload a video depends upon your internet connection speed and the size of the video you're uploading. It can take anywhere from a few minutes to several hours.


Edit YouTube videos with YouTube Video Editor
To get to the YouTube Video Editor, you can either head to TestTube (a directory of YouTube's Skunk Works projects) and click the "try it now" option, or visit the direct YouTube.com/editor link. When you sign in to the YouTube Video Editor, you'll see a video tab with the videos you just upload and an audio tab where you can select music tracks for your new masterpiece. To start the YouTube video editing, just click and drag your videos down to the editing panel (where the camera icon is).


To add clips to your video you can drag them from the "my videos" section, down to the time line, or you can hit the plus icon that's in each clip's top right hand corner. In case you're not sure what a clip contains, you can mouse over it and hit the play icon to watch the whole thing without leaving the page.


When you hover over the clips you've selected for editing, click on the scissor icon to launch your video in a pop-up window. From there, you can shorten or lengthen your clip by moving the sliders below the main video window. When you're done, just hit save, and the YouTube Video Editor will automatically merge your edited clip with the next video in your sequence.


To view the edit you're in the progress of making, you can just hit the play button and it will start wherever you set your in point. Work the start and end points into the spots where you want them, then hit save to finish the edit for that particular clip.

Add music to YouTube videos with the YouTube Video Editor (optional)
If you want to use a music soundtrack for your YouTube videos instead of the recorded sound you picked up while filming, you can click on the audio tab at the top to reveal YouTube's AudioSwap library. AudioSwap contains "tens of thousands of songs" that you can freely use in your YouTube Video Editor. All you have to do is select a song and either drags it down to the soundtrack editor or just press the plus sign to the right of each title.

You should also note that some AudioSwap tracks are subject to licensing agreements, which means YouTube may include advertisements when certain tracks are used. You also can't edit the AudioSwap track, so the song will only play from the beginning until your video stops.

Once you have finished the YouTube video editing, you just give it a title, and hit publish, YouTube will takes care of the rest. Keep in mind that the new YouTube Video Editor is still a work in progress, so you might get hit with a few bugs as you try it out.

Read more...

9/01/2010

How to download and convert YouTube 4K video

In July 2010, YouTube officially announced that it had launched a range of HD videos in the new YouTube 4K video format, which is a standard resolution for films that measures 4096x3072 pixels. This resolution is too large for watching on your Mac or iPad. So if you'd like to download and store the YouTube 4K videos on Mac or iPad, you need to convert YouTube 4K video to smaller HD video resolution first.


What is the YouTube 4K video format?
The YouTube 4K video format is a next generation standard for rendering very high quality HD video for digital cinema applications. Essentially, this YouTube 4K resolution is twice as powerful as the current 2K HD YouTube video format in digital cinemas today. The advantage of YouTube 4K HD video, aside from the even crisper detail, is that it can offer better fast-action and larger projection surface visibility.

How to download and converter YouTube 4K HD Video?
In order to enjoy 4K-resolution YouTube video on your Mac or iPad more comfortable, you need a YouTube video downloader with convert function. iFunia YouTube Converter for Mac is one that can download YouTube videos and convert them to the appropriate video format for you. The program also features a handy batch mode which allows you to download several YouTube videos at one time, making this process more efficient. Below is the step-by-step guide about how to download and convert YouTube 4K video with iFunia YouTube Converter for Mac.

Step1. Download YouTube 4K HD videos with iFunia YouTube Converter for Mac
Download the iFunia YouTube Video Converter for Mac, and open the tool. After that go to the YouTube website and select the YouTube 4K video you want to watch. Click 360P to drop-down the menu then copy the YouTube 4K video URL. Click Add button in iFunia YouTube Video Converter and paste the YouTube HD video URL. After the YouTube 4K video URLs have been added, click "Download" button and start to download the YouTube 4K videos. The download timing depends on your internet boardband.


Step2. Convert YouTube 4K Video to Mac or iPad supported format
After the YouTube 4K HD videos are downloaded completely in iFunia YouTube Video Converter for Mac, you can now convert the 4K HD videos to the Mac or iPad supported video formats that you want. The program allows you to convert 4K YouTube video to any other formats. For example, MPEG-4 is more friendly for Mac and it is also a iPad supported video format. Click the "Gear" button at the right side and change the output format you like from the "Convert to" drop-down menu list. Select the best video format for each video file and specify a directory to save the YouTube 4K HD video files. Remember that the output file size mostly depends on the Bitrate you set. Larger Bitrate, larger file size. Actually the default profile given is configured with good quality output.


Step3. Start converting YouTube 4K HD video
Now you may click the button "Convert" to begin converting the YouTube 4K HD video. The conversion progress bar will show you how much of the encoding is completed. The converting time will depend on several variables including: the duration of the YouTube 4K video file, the speed of your computer, what other activity your computer is currently doing, the codec you selected and the bitrate you set. Larger Bitrate, larger file size and longer converting time.

Conclusion
This professional YouTube Video Converter for Mac is specially designed for downloading and converting YouTube videos, and now you can also download and convert YouTube 4K HD videos with this handy tool. Get the free trial and starting your YouTube videos downloading now.

Read more...