Pages

1/11/2011

How to enjoy YouTube video on iDevice easily this holiday


YouTube is a wonderful place you can find a good amount of interesting videos in various topics. And to enjoy your favorite ones on your iDevice(iPad, iPhone 4, and iPod...) to reduce boredom on bus or train etc., you can download them off with free video downloader for Mac. Or, if you have stored them on your Mac, the only thing you need do is making sure your YouTube files are accepted by iDevice.


And if your YouTube files are unplayable on iDevice, this guide will show you how to download video content from numerous sites (YouTube, etc.) and convert videos to iPad on Mac with iFunia YouTube Converter for Mac. It is pretty simple once you get the hang of it!


Step 1: Free download and install iFunia YouTube Converter for Mac

iFunia YouTube Converter provides a perfect solution to convert YouTube videos to iPad as it capable of converting YouTube videos to iPad supported formats like .m4v, .mp4, and .mov file formats. Now HD videos from YouTube are available for download with iFunia YouTube Converter.


Step 2: Go to YouTube.com and find videos you want to convert

Launch the YouTube Video Converter on your Mac after installation click the button "Add URL" to copy the URL of the YouTube video, you may add as many YouTube video URLs as you want for downloading to your computer.


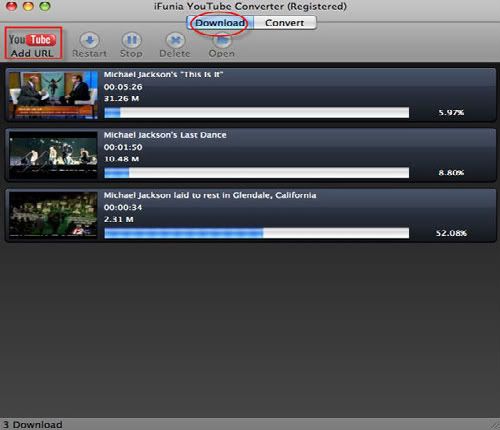
Step 3: Convert YouTube Video to iDevice supported format

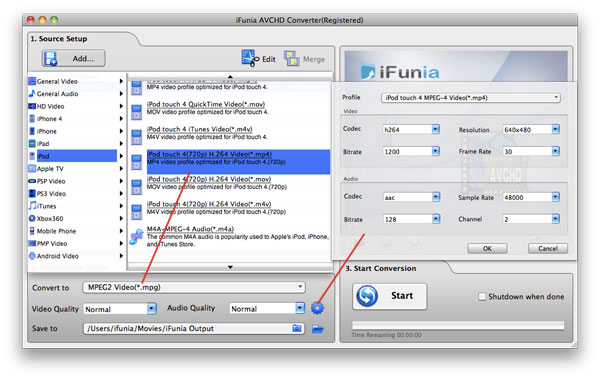
In order to import YouTube video into iDevice, you need to convert YouTube video to iDevice compatible format. Click the "Gear" button at the right side and change the output format you like from the "Convert to" drop-down menu list. Select the best video format for each video file and specify a directory to save the YouTube video files. After all settings has done hit the "Convert" button to start YouTube video to the video you wanted conversion.


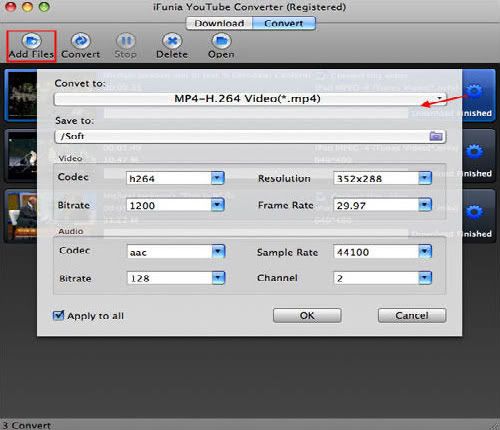
Free download iFunia Free YouTube Downloader for Mac


Tips and Tutorials:

* How to Free Download YouTube HD Video on Mac

* How to Put YouTube Videos on PSP

* How to Upload and Edit YouTube videos

* How to Download and Converter YouTube 4K Videos

* How to Convert YouTube Videos to iMovie

* Use the Best YouTube Video Converter for Mac

* Prepare Your AVCHD Video for YouTube?

* Download and Embed YouTube video to Keynote on Mac

* The Best YouTube Video Format for Uploading


Read more...

1/10/2011

How to convert M2TS MTS to QuickTime on Mac?

"I have Sony hdr-sr-1 handy cam. When I shoot videos it save the videos in .MTS format which cannot work with QuickTime on MacBook. I converted .MTS files with iSquint software but that video is not clear I can't see anything in it...I tried lots of video converters but no use...please help me out.....?"

The video format from AVCHD on Mac is .m2ts, if you want to play it in QuickTime, iTunes, or edit in iDVD, iMovie, Final Cut, etc, you need a third-party software to convert the AVCHD (MTS/M2TS) video to QuickTime videos. iFunia AVCHD Converter for Mac can help you convert HD Videos including MTS, M2TS,on Mac OS X.

Download and run this AVCHD Video Converter on Mac (Intel Version)

To install it, simply mount the .dmg archive by double-clicking it, and copy the application to your applications folder (or wherever you want).

Step 1: Load MTS/M2TS videos to MTS to QuickTime Converter for Mac

Free download, install and run Mac MTS to QuickTime Converter, Drag & drop or click "Add..." button to add MTS/M2TS videos into MTS to QuickTime converter. This MTS to QuickTime video converter for Mac supports batch conversion, so you can import and convert several multimedia files at a time.


Step 2: Edit MTS videos to improve the output quality (Optional)

If you are not satisfied with video effect, resolution, or bite rate, or you need extract some clips of the video, there are video editing functions such as trimming, cropping, changing effect and so on. To personalize your video, you can also try to add picture or text watermark with customized transparency, size and position in your videos.


Step 3: Set the output format as QuickTime and set other settings as you like.

Select QuickTime format from the output formats list in "general video" drop-down list, specify a directory on your computer to save the output files. You can change the output settings as you need. Remember that the output file size mostly depends on the Bitrate you set. Larger Bitrate, larger file size.


Step 4: Start MTS/M2TS to QuickTime conversion

Now you may click the big button "Start" to begin converting AVCHD MTS to QuickTime video. The convert progress bar shows you how much of the encoding is completed. The encoding time will depend on several variables including: the duration of the video file, the speed of your computer, what other activity your computer is currently doing and the bitrate you set.

Read more...

How to convert Canon MTS/M2TS on Mac?

If you just came back from vacation with plenty of holiday video clips shot by your Canon camcorder and were eager to save it on your Mac for playback or customizing these MTS/M2TS files in iMovie to create your own stylish masterpiece you will find that the Canon video formats are different from those videos for Mac OS X, so you can’t drag the original Canon videos(Canon FS MPEG-2,Canon DC DVD videos) and edit it on Mac. What you should do is to convert the Canon MOD videos to proper formats (like mov, mp4) that can be recognized by Mac.

The tool we will need:
A Mac Canon MTS Video Converter – iFunia AVCHD Video Converter for Mac

iFunia AVCHD Converter for Mac is a simple yet effective high definition Mac Canon MTS Video Converter which lets you edit, convert and share your Canon MTS/M2TS video clips with the greatest of ease. It supports converting AVCHD (mts, m2ts), MOD and TOD video into any HD and SD video formats, as well as converting Canon MTS/M2TS videos to your portable players.

Click here to free download AVCHD Converter for Mac (Intel Version)

Step 1: Run Mac Canon MTS Video Converter and load Canon MTS videos

Transfer the MTS/M2TS video from your Canon camcorder to your computer, and then Drag & drop or click "Add..." button to add MTS/M2TS videos into Canon MTS Video Converter for Mac, after adding the files; you can preview them in the preview pane on the right of the main interface.


(Optional) Edit videos: crop, trim, add effects, add watermark

This step is optional step. But when you come to review the Canon HD MTS video your taken and find it's too dark or the focus is blurred, you may wanna fix these flaws and apply artistic effects with the Edit Video module of the program. Plus, with just a few clicks, you can crop the MTS video to remove black sides, trim the video and add text or image watermark easily as below.


Step 2: Select an output format and set other settings as you like.

Use the "Convert to" on the bottom of the window to control the output format. Select the video output format for each video file and specify a directory on your computer to save the output files. You can change the output settings as you need. Remember that the output file size mostly depends on the Bitrate you set. Larger Bitrate, larger file size.


Step 3: Start converting Sony MTS/M2TS files to your Mac

Now you may click the big button "Start" to begin converting AVCHD M2TS/MTS to Mac supported video. The convert progress bar shows you how much of the encoding is completed. The encoding time will depend on several variables including: the duration of the video file, the speed of your computer, what other activity your computer is currently doing and the bitrate you set.


Read more...

How to convert MTS to iPod on Mac?


Related Article
* How to import/convert M2TS MTS to iDVD on Mac?
* How to import/convert M2TS MTS to FCP on Mac?
* How to import/convert M2TS MTS to iMovie on Mac?
* How to Use M2TS converter to convert M2TS to AVI?
* How to convert MTS to YouTube on Mac?

If you have an AVCHD camcorder, you probably have some MTS files stored on your Mac. To import these MTS footages to iPod for convenient playback or easy sharing, you need to convert these MTS files to iPod supported video format first. For a hassle-free experience and high quality video output, I recommend iFunia AVCHD Converter for Mac, which provides optimized presets for your iPod so you don't need to worry about the settings for your iPod.
Click here to free download AVCHD Converter for Mac (Intel Version)

To install it, simply mount the .dmg archive by double-clicking it, and copy the application to your applications folder (or wherever you want).


Step 1: Run iFunia AVCHD Converter to convert the MTS videos to iPod

First copy the AVCHD (.MTS, M2TS) file from your video camera to your hard drive. then install and run iFunia AVCHD Video Converter, Click the "Add..." button to add the AVCHD videos which you want to convert, you may add as many MTS videos as you want for batch conversion to iPod.


Step 2: Edit MTS videos to improve the output quality (Optional)

After importing AVCHD MTS/M2TS videos, please click "Edit" button to access to the Video Edit panel. To personalize your video, you can also try to add picture or text watermark with customized transparency, size and position in your videos.

Step 3: Select "iPod" in output format list

Press the down-arrow menu of the Profile, select the iPod, and then select the suitable format you need, such as: iPod h.264 or MPEG-4, Remember that the output file size mostly depends on the Bitrate you set. Larger Bitrate, larger file size. Actually video with bitrate as 768 is acceptable for watching.

Step 4: Start MTS/M2TS to iPod conversion

Now you may click the big button "Start" to begin converting AVCHD MTS to iPod video. The convert progress bar shows you how much of the encoding is completed. The encoding time will depend on several variables including: the duration of the video file, the speed of your computer, what other activity your computer is currently doing and the bitrate you set.


Read more...

How to convert Sony MTS/M2TS on Mac?


* How to convert M2TS MTS to iPhone on Mac?
* How to Convert M2TS MTS to PS3 on Mac?
* How to convert AVCHD M2TS/MTS to iPad on Mac?
* How to convert Canon MTS/M2TS on Mac?

So you have a Sony camcorder and record lots of beautiful memories of your family, friends and trips, want to save it on your Mac for playback or for sharing with your friends? However, as the MTS/M2TS video format is for the HD camcorders, and the portable multimedia devices do not support playing the M2TS video directly, we have to convert M2TS to videos that supported by those players.

If you want to enjoy the MTS video on your portable device, iFunia AVCHD Video Converter will be the best assistant of you. It can help you convert MTS with perfect output quality. And the use-friendly interface can make the operation quite easy.
Click here to free download AVCHD Converter for Mac (Intel Version)

To install it, simply mount the .dmg archive by double-clicking it, and copy the application to your applications folder (or wherever you want).

Step 1: Run Sony MTS Video Converter for Mac and import M2TS or MTS video files

Free download iFunia AVCHD Video Converter for Mac. Install it in your computer and launch, transfer the MTS/M2TS video from your Sony camcorder to your computer, then Drag & drop or click "Add..." button to add MTS/M2TS videos into Sony MTS Video Converter for Mac, after adding the files, you can preview them in the preview pane on the right of the main interface.

(Optional) Edit videos: crop, trim, add effects, add watermark

This step is optional step. But when you come to review the HD MTS video your taken and find it's too dark or the focus is blurred, you may wanna fix these flaws and apply artistic effects with the Edit Video module of the program. Plus, with just a few clicks, you can crop the MTS video to remove black sides, trim the video and add text or image watermark easily as below.

Step 2: Select an output format and set other settings as you like.

Use the "Convert to" on the bottom of the window to control the output format. Select the video output format for each video file and specify a directory on your computer to save the output files. You can change the output settings as you need. Remember that the output file size mostly depends on the Bitrate you set. Larger Bitrate, larger file size.

Step 3: Start converting Sony MTS/M2TS files to your Mac

Now you may click the big button "Start" to begin converting AVCHD M2TS/MTS to PS3 MP4 video. The convert progress bar shows you how much of the encoding is completed. The encoding time will depend on several variables including: the duration of the video file, the speed of your computer, what other activity your computer is currently doing and the bitrate you set.

Read more...