Pages

9/01/2010

How to download and convert YouTube 4K video

In July 2010, YouTube officially announced that it had launched a range of HD videos in the new YouTube 4K video format, which is a standard resolution for films that measures 4096x3072 pixels. This resolution is too large for watching on your Mac or iPad. So if you'd like to download and store the YouTube 4K videos on Mac or iPad, you need to convert YouTube 4K video to smaller HD video resolution first.


What is the YouTube 4K video format?
The YouTube 4K video format is a next generation standard for rendering very high quality HD video for digital cinema applications. Essentially, this YouTube 4K resolution is twice as powerful as the current 2K HD YouTube video format in digital cinemas today. The advantage of YouTube 4K HD video, aside from the even crisper detail, is that it can offer better fast-action and larger projection surface visibility.

How to download and converter YouTube 4K HD Video?
In order to enjoy 4K-resolution YouTube video on your Mac or iPad more comfortable, you need a YouTube video downloader with convert function. iFunia YouTube Converter for Mac is one that can download YouTube videos and convert them to the appropriate video format for you. The program also features a handy batch mode which allows you to download several YouTube videos at one time, making this process more efficient. Below is the step-by-step guide about how to download and convert YouTube 4K video with iFunia YouTube Converter for Mac.

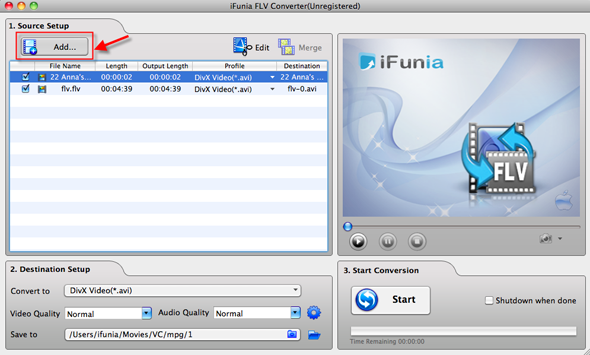
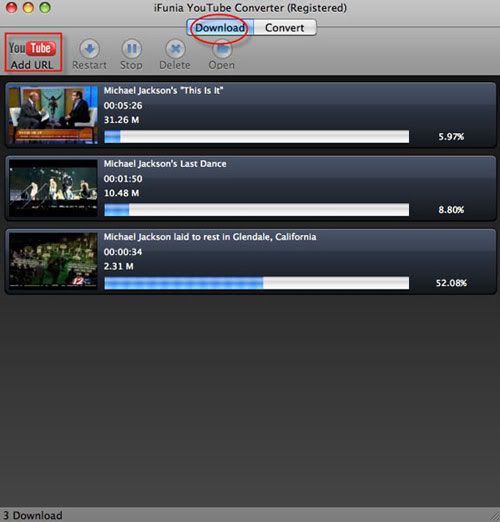
Step1. Download YouTube 4K HD videos with iFunia YouTube Converter for Mac
Download the iFunia YouTube Video Converter for Mac, and open the tool. After that go to the YouTube website and select the YouTube 4K video you want to watch. Click 360P to drop-down the menu then copy the YouTube 4K video URL. Click Add button in iFunia YouTube Video Converter and paste the YouTube HD video URL. After the YouTube 4K video URLs have been added, click "Download" button and start to download the YouTube 4K videos. The download timing depends on your internet boardband.


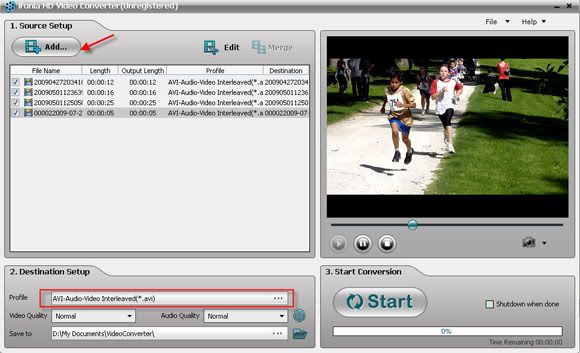
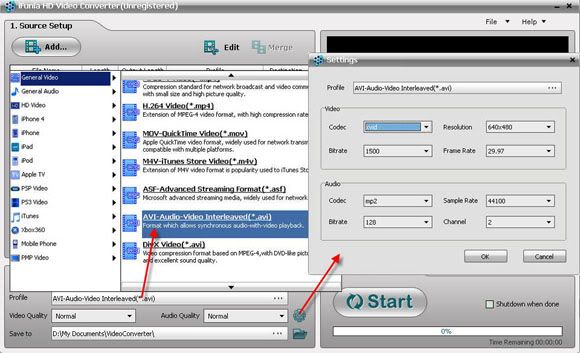
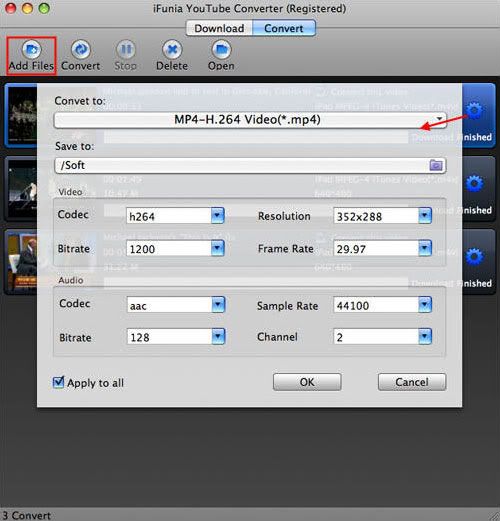
Step2. Convert YouTube 4K Video to Mac or iPad supported format
After the YouTube 4K HD videos are downloaded completely in iFunia YouTube Video Converter for Mac, you can now convert the 4K HD videos to the Mac or iPad supported video formats that you want. The program allows you to convert 4K YouTube video to any other formats. For example, MPEG-4 is more friendly for Mac and it is also a iPad supported video format. Click the "Gear" button at the right side and change the output format you like from the "Convert to" drop-down menu list. Select the best video format for each video file and specify a directory to save the YouTube 4K HD video files. Remember that the output file size mostly depends on the Bitrate you set. Larger Bitrate, larger file size. Actually the default profile given is configured with good quality output.


Step3. Start converting YouTube 4K HD video
Now you may click the button "Convert" to begin converting the YouTube 4K HD video. The conversion progress bar will show you how much of the encoding is completed. The converting time will depend on several variables including: the duration of the YouTube 4K video file, the speed of your computer, what other activity your computer is currently doing, the codec you selected and the bitrate you set. Larger Bitrate, larger file size and longer converting time.

Conclusion
This professional YouTube Video Converter for Mac is specially designed for downloading and converting YouTube videos, and now you can also download and convert YouTube 4K HD videos with this handy tool. Get the free trial and starting your YouTube videos downloading now.

Read more...

8/30/2010

How to use iFunia M2TS converter to convert MT2S video to AVI, MOV, WMV, MP4, FLV, etc.


This article is about .M2TS which is commonly used for high-definition video on Blue-Ray Disc and AVCHD. After reading this article, you will know what’s M2TS? How to play M2TS files? How to convert M2TS to mainstream video format AVI, MP4, WMV, MOV, FLV etc.


What is M2TS?
A .M2TS file is a Sony high definition video file type. M2TS files are raw AVCHD videos recorded using Sony's camcorders, such as the HDR-SR1 and HDR-SR5 models. Panasonic, Canon and other brands of AVCHD camcorders also record in M2TS format.
Currently, M2TS files can be played using the Picture Motion Browser, which is an application video player provided with Sony AVCHD camcorders. M2TS files can also be played with Mplayer, Windows Media Player and other media players if there is a codec for DVD playing installed. But the file type .M2TS is not always automatically associated with the player, so it may be necessary to open it from the player. That's to say, it's not convenient to play and enjoy your M2TS video.

What's more, this format cannot be usually played on your computer or portable players. So firstly you need convert the format to the common video formats such as AVI, WMV, MP4, MOV, 3GP, FLV, SWF, DivX, XviD etc..

How to play M2TS file?
AVCHD camcorders are shipped with software designed to playback the files on your computer. Sony’s HDR-SR1 and the newer HDR-SR5 both record video in AVCHD format and they are shipped with the Picture Motion Browser, which plays back AVCHD files on most computers. If you purchased one of the Panasonic AVCHD camcorders, the included HD Writer should allow you to playback video recorded with your camcorder.

How to convert M2TS to AVI, FLV, WMV, MP4, MKV, etc.?
What software can do this and how to convert M2TS files to AVI, FLV, WMV, MP4, MPEG, etc.? To solve these problems, I find a number of related software which can convert M2TS files to popular video formats, such as iFunia M2TS Video Converter for Windows. Here, I would take iFunia M2TS Converter for Windows as an example on how to achieve the conversion.

Step1. Source Setup
Download and run iFunia M2TS Video Converter on your computer, then click the "Add..." button to browse your computer hard disc and add the .M2TS files you want to convert to the program. Batch conversion is supported by this HD video converter, so you can load several M2TS files at one time.


Step2. Destination Setup
After you added M2TS files, you can select AVI output format and specify a directory on your computer to save the output files. iFunia M2TS Converter also supports comprehensive video formats including MPEG, WMV, MP4, MOV, XviD, 3GP, FLV, etc. You can also change the video bitrate, size and frame rate for a desired quality or compression in the setting window below.


Step3. Start Conversion
Click the "Start" button to start conversion and then you can just go out for a walk or take a nap, and the conversion may have been finished when you come back : )

Optional: Edit your M2TS files
When you come to review the HD video you're taken, how often do you find it's too dark, or the focus is blurred? Now you can fix these flaws and apply artistic effects with the Edit Video module of the program. iFunia M2TS Video Converter can help you set video brightness, contrast, saturation, crop video, trim video and even merge multiple files into one single file before the conversion.


Trim Video:
This M2TS Video Converter for Mac allows you to trim your video, so you can capture your favorite video clips.
Select the video you want to edit, and then click the "Edit" button on the top. A Edit window will be prompted. Click the Start Point and End point to keep your favorite parts of video in iFunia M2TS video converter.
Crop Video:
To watch your movies on your portable players in full screen, you can also remove the black edges around your video with this iFunia M2TS Video Converter. Click "Crop" tab to open the Crop Video window, and then tick the "Enable Crop" option box.
Set Effect:
If you want to adjust the video effect of your movie, you can click the Effect tab and then tick "Enable Effect" option box.
Drag each effect adjustment slider to set the video brightness and contrast. You can also choose a special effect from the Effect drop-down list to apply to your movie.
Add Watermark:
If you want to add watermark on your video, you can click Watermark tab and then tick "Enable Watermark" option box.

Tips
* iFunia M2TS Converter run well on Windows 7 and other windows version.
* It also a HD Converter, can convert between popular HD video formats, including HD AVI, AVCHD M2TS, MTS, TS, HD MOV, HD WMV, HD MP4, HD FLV, and more.
* The iFunia M2TS Converter allows down-convert HD video to standard definition.
* If you are a MAC user, please just refer to iFunia M2TS Video Converter for MAC.

Read more...

Experiment of html5 with "a custom interactive music video".


The first thing you do when you visit the site is type in your address of where you grew up, and then once it’s all happy and loaded, a video of a guy running down the street begins along with the music. You’re also presented with a window where you can write a letter to your younger selves.

From here on in you don’t have to do anything, just sit back and enjoy. Suddenly all these different windows begin to pop up on your screen in collaboration with the music, some with simple graphics and others with views and streetviews of your hometown courtesy of Google Maps.


This is an interesting experiment of html5 with “a custom interactive music video”. It’s made using HTML5 instead of Flash. According the text, “[HTML5] is in its infancy right now”, and multimedia creator ifunia list a data that “Only 10% of Web video encoded in H.264 or HTML 5, not Flash.” supporting this opinion. So this is just an interesting experiment, if you got some Flash .flv video and want to watch them, maybe you need 3-rd party video converter software to help you.

Chrome Experiments.

Read more...

8/29/2010

How to convert FLV(Flash) to MP4, WMV, AVI, MOV or any other format on MAC easily


"I am trying to find the most cost effective way to convert YouTube flv files to AVI for Mac OS X with which I can make it simple to play FLV on my computers / DVD players... plz suggest a solution which is free to download and is fully working ...even on a trial basis?"

With some tricks, it's now possible to download the videos that hosted and shared on online video sites such as YouTube and Google Video, instead of just watching the video embedded on the websites.

Some video files that are downloaded from these online video hosting sites may be in the format of Flash Video (.flv). For whatever reasons, such as prefer to view and store the videos in MP4 format, or want to play the offline video clips in portable player such as iPad and PSP, or simply don't like to view it with FLV Player, then there is a need to convert the .flv video format to another format such as avi, mov, wmv and .mpg. It’s easy to convert FLV files to WMV, AVI or any other format you prefer with some tools and conversion utilities like iFunia FLV Converter that can be used to do the media format conversion.

If you are looking for Desktop conversion software then iFunia FLV Converter for Mac is the best one. This one is fully compatible with Snow Leopard. It can handle FLV to AVI conversion and can convert also FLV to nearly anything you would want on Mac. The program also supports batch conversion so you can add multiple FLV video in a queue and quickly grab a cup of coffee while the program converts them to the desired AVI format. Here are the easy steps.

Step 1. Run iFunia FLV Converter for Mac and add FLV video files
Download and run iFunia FLV Converter on your Mac and click the big button "Add..." to add FLV video files, you may add as many FLV videos as you want for batch conversion.


(Optional) Merge some separate FLV videos to 1 single file
This is optional. But if you want to output one single file for easily sharing with your friends, simply click on the video titles you'd like to merge , then click 'Merge' button and uncheck the former separate files if you just need the single merged video file. Here 'click on the video titles' is not just check the options, you need to click them to make them highlight. You may see the image below to have an idea.


Step 2. Select the prefer format from the output format list
Select a prefer output format for each video file, here I choose "avi". And then specify a directory on your computer to save the output files.If you’re familiar with the 'Xvid/DivX' compression format used for those TV-shows rips, you might know how nicely compressed those AVI videos are. Here we set the output video format to XviD AVI format which provides a best compromise between file size and video quality. Remember that the output file size mostly depends on the Bitrate you set. Larger Bitrate, larger file size. Actually video with bitrate as 768 is acceptable for watching.


Step 3. Start converting FLV videos
Now you may click the big button "Start" to begin converting FLV on Mac. The convert progress bar shows you how much of the encoding is completed. The encoding time will depend on several variables including: the duration of the video file, the speed of your computer, what other activity your computer is currently doing and the bitrate you set.

Tips:
* iFunia FLV Converter comes with two modes of conversion: convert FLV to video and convert video to FLV, you can choose the model at the beginning.
** FLV to Video mode helps you convert FLV files to all popular video and audio formats, such as converting FLV to AVI, FLV to MP4, FLV to WMV, FLV to MP3, FLV to MOV and more.
** Video to FLV mode helps you convert all the main-stream video formats to FLV video, such as converting AVI to FLV, MP4 to FLV, 3GP to FLV, WMV to FLV, MPEG to FLV and more.
* You can do simple editing like trimming, cropping, adding special effects, watermark to video and deinterlace video by clicking "Edit". Real-time preview provided while editing.
* You can preview the video by selecting the video and clicking Play in the preview pane. You can also take snapshot and save them as jpg, bmp file while preview.

Read more...